How Do I? Face Detection based on Skin colour point pixel processor using OpenCV
This was my project for Digital Image Processing in NUST taught by a great teacher Naveed Sarfaraz Khattak. Thanks all for giving such knowledge and making it easy to study.
Problem Description:
The program will input colour triples, or subimages, that are training samples of human face colour. Let's refer to this colour as C. (Human face colour should NOT be built into the program. By doing this, we should be able to use the same program to extract water, green grass, etc.)
The program will read some constraints on the features of the regions targeted, such as the range of area, elongation, etc.
The program will identify all pixels of the input image that have colour similar to the training samples.
The program will identify each connected region of colour C as an object and measure features of each such region. The program will report only those regions that have properties similar to a human face.
The program will output the input image in P3 format with the bounding box of each face candidate overlaid in white (225,225,225)
Summary of Choices:
I have done this project in OpenCV library using Visual Studio 2010. I am using 1- OpenCV
2- WPF
Skin colour detection Methods:
There are two ways of detecting skins,1- Region based detection
2- Point pixel processing
This project requires doing the pixel processing.
Colour Models:
There are different types of colour models. Most used and known colour model is RGB. This colour model presents the colour in three bytes with each byte present a property of colour. To process skin colour in this model requires processing all three byte values.HSV is the other well known format. This format presents the colour detail in one byte the other two bytes used to store the strength and brightness of colour. Using this colour model has added benefit of one dimension processing rather than three dimensions processing in RGB colour model.
For this project, I have chosen to use the HSV colour model. By going through the different research publishing on point processing and their result, HSV produces the best pixel processing results as you can see in figure 1.
HSV for colour detection:
HSV colour model uses H for saving the colour. Only using H for skin detection can very successful. Skin colour is different between different races. Using the result of “Comparative Study of Statistical Skin Detection Algorithms for Sub-Continental Human Images” determines that
| Range | Result |
2<h<45 | 95.4 |
4<h<40 | 93.2 |
5<h<35 | 91.1 |
10<h<30 | 84.8 |
Using the above table and by experimenting with different range of H, I end up using 6<h<18 that produces the good result in my selected images from internet.
Skin colour detection Algorithm:
Algorithm is based on the study of HSV “Skin Detection using HSV colour space”. Following figure shows the details
Figure 2 : Algorithm Detail
Algorithm:
Open ImageConvert Image to HSV colour model
For each row of height
For each column in width
If pixel’s H is between 6 and 18
Tag this as skin pixel
Else
Tag this as a white pixel
End For
End For
Dilate Image with 5x5 Kernel
Erode Image with same 5x5 Kernel
Median Smooth with 3x3 Kernel
Use the Label Image Project 2
After Objects has been labelled
Draw Rectangle on every Object find
Code:
// Detecting skin inside the picture
String^ SkinDetection(String^ filePath,String^ savePath,String^ extension)
{
  // Primary image
  IplImage *primaryImage = cvLoadImage( StringToChar(filePath),1);
  // creating image from the source
  IplImage *source=cvCreateImage( cvGetSize(primaryImage), 8, 3 );
  // creating HSV image from the source
  cvCvtColor(primaryImage,source,CV_BGR2HSV);
  // Destination image that will be created from the image, binary image
  IplImage *destination=cvCreateImage( cvGetSize(source), 8, 1 );
  // intermediate image that will only have SKIN
  IplImage *intermediateImage=cvCreateImage(cvGetSize(source),8,3);

  int height= source->height; // number of lines
  int bytesPerRow= source->width * source->nChannels; // total number of element per line
  int channels=source->nChannels;
  int step= source->widthStep; // effective width

  unsigned char *data= reinterpret_cast<unsigned char *>(source->imageData);
  unsigned char *dData= reinterpret_cast<unsigned char *>(destination->imageData);
  unsigned char *iData= reinterpret_cast<unsigned char *>(intermediateImage->imageData);
  unsigned char *pData= reinterpret_cast<unsigned char *>(primaryImage->imageData);


  int dIndex=0;
  int dStep=destination->widthStep;

  //start of parsing each pixel
  for (int i=0; i<height; i++)
  {
    dIndex=0;
    for (int j=0; j<bytesPerRow; j+= channels)
    {
      int value=data[i*step+j];
      if(value> 6 && value<18) // if skin is in this pixel
      {
         iData[i*step+j]=pData[i*step+j];
         iData[i*step+j+1]=pData[i*step+j+1];
         iData[i*step+j+2]=pData[i*step+j+2];
         dData[i*dStep+dIndex]=0;
      }
      else // if skin is not in this pixel
      {
         iData[i*step+j]=255;
         iData[i*step+j+1]=255;
         iData[i*step+j+2]=255;
         dData[i*dStep+dIndex]=255;
      }
      dIndex+=destination->nChannels;
   }

  }

    //
    SaveImage(source,savePath+"_HSV.jpg");
    SaveImage(destination,savePath+"_Skin.jpg");
    // Dilate the image
    destination =Dilate(destination);
    SaveImage(destination,savePath+"_Dilated.jpg");
    // Erode the image
    destination=Erode(destination);
    SaveImage(destination,savePath+"_Eroded.jpg");
    // Smoothing image
    destination=MedianSmooth(destination);
    SaveImage(destination,savePath+"_MedianSmooth.jpg");
    //Labeling image and showing bounding box
    SaveImage(intermediateImage,savePath+"_Intermediate.jpg");
    String^ objects=LabelIamge(SaveImage(destination,savePath+"_Label.jpg"),savePath,primaryImage);
    return objects;
}
Description:
With the look at above algorithm, it becomes relatively easy to do the skin detection. Using the last project code, I was able to label the output image of skin detection. Skin detection function output the binary image that became the input for label image. Label image function goes through each object and trashes the objects with regions that have less than twenty pixels. Than using the bounding box details of each object found in the labelled image, a red circle drawn as the bounding box.Results:
Many images are used to test the result of this program. Algorithm goes through the image and output the eight images on every stage of processing
Original Images:

HSV images:

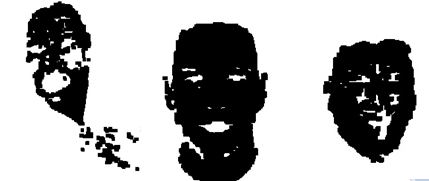
Skin Detected:
Notice all the noise in binary images
Dilation:
Notice all noise is removed

Erode:
Median Smooth:

Labelled Image:

Main program screen:

Reference Materials:
1- Skin Detection using HSV colour space by V. A. OLIVEIRA, A. CONCI
2- Comparative Study of Statistical Skin Detection Algorithms for Sub-Continental Human Images by M. R. Tabassum, A. U. Gias, M. M. Kamal, H. M. Muctadir, M. Ibrahim, A. K. Shakir, A.Imran, S. Islam, M. G. Rabbani1, S. M. Khaled, M. S. Islam, Z. Begum
3- Color Space for Skin Detection – A Review by Nikhil Rasiwasia Fondazione Graphitech, University of Trento, (TN) Italy
Download source project + document + sample images + resulted images
Hi, this algorithm is so helpful for me to detect the number of faces in an image.....but i am unable to label the final image with detected objects. Please provide me the label image function code if possible. thank you so much.
ReplyDeleteHi,
ReplyDeleteI would love to do this job for you, unfortunately i am so busy these days. contact me on mamoonr@gmail.com to gtalk and i may be able to help you out.
please give me the complete code of this project. My mail id is arun.gtm11@gmail.com
ReplyDeleteupdated link for downloading this project: http://1drv.ms/1fBCFsM
ReplyDelete