Saturday, March 10, 2012

simple Web Service Agent Pattern Webservice Endpoint configuration for local/live hosting

Setting up webservice to consume is difficult as it has to be hosted in different enviornements and sometime it is difficult to understand the webservice call errors when moving from local to live hosting. Most of the time we rely on auto generated Urls in configuration files.

Best way to handle such situation is to properly configure Urls in local and hosting enviornements. But if it is required to configure the webservice from code behind, i have a simple solution.

Other than that i am going to introduce you to service agent pattern. This is a very simple and generic pattern for Asynchoronous web clients like silverlgiht. This helps configure webservice in reuseable way and makes testing easier. Helps in plugable webservice, and specially in IoC/Dependecny injections.

namespace FileUploader.ServiceAgents
{
    public interface IImageServiceAgent
    {
        void SaveImage(byte[] buffer, string fileName, EventHandler callback);
    }

    public class ImageServiceAgent : IImageServiceAgent
    {
        private readonly ImageServiceSoapClient _proxy;


        public ImageServiceAgent()
        {
            Binding binding = new BasicHttpBinding();
            var endpoint = new EndpointAddress(
                new Uri(Application.Current.Host.Source, "../Webservices/ImageService.asmx"));
            _proxy = new ImageServiceSoapClient(binding, endpoint);
        }

        #region IImageServiceAgent Members

        public void SaveImage(byte[] buffer, string fileName, EventHandler callback)
        {
            _proxy.SaveImageCompleted += callback;
            _proxy.SaveImageAsync(buffer,fileName);
        }

        #endregion
    }
}

Lets start with the inteface. First line defines the IImageServiceAgent. This interface lists all the functions of webservice along with their call backs.

In the implemenations, it has service client that is using basicHttpBinding with endpoint configuraiton in such a way that it will automatically handle any enviornment given that your client and web service is hosted in the same hosting url.

Implementaion of SaveImage is simple, first it subscribes to SaveImageCompleted call back and then calls the Async client.

This is a good way as it can helps using anonymous functions in a good way. Let me know if this helps you or you have a better solution to today world coding standards.

Tuesday, April 19, 2011

single line news/feed scroller with jQuery

How Do I? Single Line news/feed Scroller with jQuery

Working Preview:

  • scroll headline 1
  • scroll headline 2
  • scroll headline 3
  • scroll headline 4
  • scroll headline 5

While working on my own, I decided to implement a very simple news/feed one line scroller. Idea is simple and in use a lot of websites. Doing it with jQuery is a pleasure.

It will use the Unordered List and will scroll each List Item according to predefined scroll interval. Also while this scrolling is going on, each item will do it with Scroll animation of jQuery.

It is a recursive function and it will schedule call with itself again and again to continue scrolling. It has no stopping criteria as associated with must do recursive functions as it required to be scrolled all the time.

Parameters Detail
It takes 4 parameters.
Unordered List Id: ulId
If you call it firstTime then this bit will be true : isFirstTime
Time between next news/feed: scrollTimeInterval
Time of animation when changing news/feed: animationTimeInterval

Please see the code as listed below and download link is at the end of this article.

//call the function when document is ready to start the scrolling
$(function(){
    ScrollMessages("ulHeadlines",true,3000,1000);
});

function ScrollMessages(ulId,isFirstTime,scrollTimeInterval,animationTimeInterval) 
{
    //Get the Unordered List
    var ul=$("#"+ulId);
    //Get all List Items
    var lis=$("li", ul);
    //If it is not the first time, Current item is the visible one
    var current = $("li:visible:first", ul);
    //if it is the first time, it is the first item of list. Show the first item of list 
    if(isFirstTime)
    {
        //hide all list items
        lis.hide();  
        //get the first list item
        current=$("li:first",ul);
        //show only the first item
        current.show();
    }
    //if it is not the first time then calculate the next item to show and show that item.
    else
    {
        //Get the index of item that will be shown 
        var index=current.index();
        //if it is the last item then current items should be the first item of list else it should be the next item of list
        if (index + 1 == lis.size()) {
            index = 0;
        }
        else {
           index += 1;
        }
        //slide up and hide the current item
        current.slideUp(animationTimeInterval);
        //slide down the next item that is going to be shown 
        $("li:eq(" + index + ")", ul).slideDown(animationTimeInterval);
    }
    //re call this funcation to continue the scroll news recursively
    setTimeout(function(){ScrollMessages(ulId,false,scrollTimeInterval,animationTimeInterval);}, scrollTimeInterval);
}

Click here to download sample

Monday, April 18, 2011

check/uncheck all records using jQuery

How Do I? check/uncheck all checkboxed on header check box click using jQuery


Working with tables using javascript became easy with jQuery or even with any sort of DOM manipulation. There is one task we repeatedly do i.e. to check/uncheck all the records. Even though its not a difficult problem and usually everybody has its own implementation of this activity. There is perhaps a generic code written which is used by all.

Small challenge:
There is one complexity with this scenario. If all checkbox are selected, then header checkbox should be checked. So in any case if a user uncheck any of record checkbox, it should uncheck the header checkbox also and vice versa if user manually select all records then header checkbox should be checked
The following code is written to overcome such situation in minimum line of codes. Please see the comments and implementation and let me know if you like this approach.

//call the function when document is ready to bind the events with header checkbox to select/unselect all
$(function(){
    //call the function on document ready function
    SelectAll("tblTest","cbHeader");
});

function SelectAll(tableID,cbHeaderID)
{
    //select the table that has the checkboxes
    var table=$("table[id$='"+tableID+"']");
    //bind event with header checkbox change event
    $("input[id$='"+cbHeaderID+"']",table).change(function(){
    //check/uncheck all the checkboxes based on header element status
    $("input:checkbox",table).attr('checked',$(this).attr('checked'));});
    //bind event with all the other checkboxes 
    $("input:checkbox:gt(0)",table).change(
    function(){  
        // if number of checked checkboxes are les than number of checkboxes than uncheck the header checkbox
        var isAllChecked=$("input:checkbox:gt(0)",table).size() > $("input:checkbox:checked:not(#"+cbHeaderID+")",table).size()?false:true;
        $("input:checkbox:first",table).attr('checked',isAllChecked);
    });
    
}

Click here to download the sample page

show hide columns of table in jQuery

How Do I? Show/hide columns of table based on Multi Select list box in jQuery


Large reports with many columns you must give some extra customization. One of them is to show hide columns based on a multi select list. This article describes the easiest way of doing it with a generic code.
Assumption:
Table is well formatted i.e. it has a thead and tbody tag.

Brief Description:
When page load and document ready function is fired, it will bind a function to change event of multiple select list.
It then loop over the whole select options to see the selected items and hide then if they are selected or show them if they are not selected.
Here is the code,

$(function(){
// add an function on multiple select list ddlcolumns change event
    $("#ddlColumns").change(function(){
        //get the table whose columns will be manipulated
        var table=$("#tblTest");
        //get the first row or thead row
        var headerRow=$("tr:first",table);
        // loop over each option in multiple select list
        $("option",this).each(function(){
            //get the index of current option value e.g. "Header 1"
            var index=$("th:contains("+this.value+")").index();
            // if current option is selected then hide the column along with header else show the column if it is already hidden
            if($(this).attr('selected'))
            {
                $("td:nth-child("+(index+1)+"),th:nth-child("+(index+1)+")",table).hide();
            }
            else
            {
                $("td:nth-child("+(index+1)+"),th:nth-child("+(index+1)+")",table).show();
            }
        });
    });
});

I hope this will help.
Click here to Download sample

Saturday, March 5, 2011

File uploading in chunks using HttpHandler and HttpWebRequest

How Do I? File uploading in chunks using HttpHandler and HttpWebRequest


This is a sample code that shows how to upload file using HttpHandler in chunks. This may not seems like a very good idea in isolation but this could help when creating a file upload control in Silverlight. I already have an article that shows how to upload file using web service in chunk. You can read this article here. When talk about file uploading using web service, it has many disadvantages like 1- it has a limit of sending and receiving data and 2- it pads data that increase the sending data, to name a few problems.

HttpHandlers are better in many ways; this technique could be used to enable huge files. It will understand the entire authentication and authorization constrains already implemented in your web application.
This article has two distinct parts
1- How to send data in chunks using HttpWebRequest
2- How to receive and save data in HttpHandler

Sending data in chunks
The implementation of HttpWebRequest is very simple. It has the following steps
1- Open a file
2- Start reading a chunk
3- Convert the chunk in Base64 String
4- Send the chunk to HttpHandler along with some basic file information e.g. file name

HttpWebRequest will post data to HttpHandler because of data limitation and sercurity of data in a Key-Value pair.

And here is the code
Function that will convert the file into chunk requests

private void ConvertToChunks()
{
 //Open file
 string file = MapPath("~/temp/1.xps");
 FileStream fileStream = new FileStream(file, FileMode.Open, FileAccess.Read);
 //Chunk size that will be sent to Server
 int chunkSize = 1024;
 // Unique file name
 string fileName = Guid.NewGuid() + Path.GetExtension(file);
 int totalChunks = (int)Math.Ceiling((double)fileStream.Length / chunkSize);
 // Loop through the whole stream and send it chunk by chunk;
  for (int i = 0; i < totalChunks; i++)
  {
    int startIndex = i * chunkSize;
    int endIndex = (int)(startIndex + chunkSize > fileStream.Length ?   fileStream.Length : startIndex + chunkSize);
    int length = endIndex - startIndex;

    byte[] bytes = new byte[length];
    fileStream.Read(bytes, 0, bytes.Length);
    ChunkRequest(fileName, bytes);
  }
}

Function that will send the chunk to httpHandler
private void ChunkRequest(string fileName,byte[] buffer)
{
 //Request url, Method=post Length and data.
 string requestURL = "http://localhost:63654/hello.ashx";
 HttpWebRequest request = (HttpWebRequest)WebRequest.Create(requestURL);
 request.Method = "POST";
 request.ContentType = "application/x-www-form-urlencoded";

 // Chunk(buffer) is converted to Base64 string that will be convert to Bytes on  the handler.
 string requestParameters = @"fileName=" + fileName +
"&data=" + HttpUtility.UrlEncode( Convert.ToBase64String(buffer) );

 // finally whole request will be converted to bytes that will be transferred to HttpHandler
 byte[] byteData = Encoding.UTF8.GetBytes(requestParameters);

 request.ContentLength = byteData.Length;

 Stream writer = request.GetRequestStream();
 writer.Write(byteData, 0, byteData.Length);
 writer.Close();
// here we will receive the response from HttpHandler
 StreamReader stIn = new StreamReader(request.GetResponse().GetResponseStream());
 string strResponse = stIn.ReadToEnd();
 stIn.Close();
}

Receiving and saving Chunk data in HttpHandler
It will
1- Receive the chunk and file information
2- Convert back the chunk to byte[] from Base64 string
3- Save the chunk by
a. Creating a new file if file not existed
b. Opening the existing file

Here is the Code

Function that will receive the request in HttpHandler
public void ProcessRequest(HttpContext context)
{
 //write your handler implementation here.

 string fileName = context.Request.Params["fileName"].ToString();
 byte[] buffer = Convert.FromBase64String ( context.Request.Form["data"]);
 SaveFile(fileName, buffer);
}
Function that will Save the file

public void SaveFile(string fileName, byte[] buffer)
{
 string Path = HttpContext.Current.Server.MapPath("~/upload") +"\\"+ fileName;
 FileStream writer = new FileStream(Path,File.Exists(Path)?FileMode.Append:FileMode.Create, FileAccess.Write);

 writer.Write(buffer, 0, buffer.Length);
 writer.Close();
}

To use HttpHandler, it must be configured in web.conf like shown below
<add verb="*" path="*.ashx" type="handlertest.IISHandler1, handlertest"/>

Hope this will help , Please click here to download the sample application. Please see the Default.aspx.cs for HttpWebRequest section and IISHandler1.cs for HttpHandler section.

Saturday, February 12, 2011

Using jQuery CreateTable Plug-in to convert JSON into Table

How Do I? Explanation of jQuery Create Table Plug-in to convert JSON into table easily

Download Plug-in and sample
Download Asp.Net ajax sample and Plug-in
Template

{sr} {Name} {Mobile} {isActive}
{sr} {FirstName} {LastName} {Mobile} {isActive}
{Pager}

This is a complete template that contains a header, body and footer. It must have thead/tbody and tfoot for properly converting a table.

After creating a templat, get the data from server and pass it by using the following syntax
$("table").CreateTable({ Body: data });

That leads us to all available configuration and options. Here are the list of options that can be passed with their default values.
{ Head: null, Body: null, AjaxPager: false, CurrentPage: 0, TotalPages: 0, PageSize: 10, Pager: true,OnRow_Bounded:null,OnPager_Clicked:null }

To build a simple talbe only data is required and it automatically do the rest. But to use ajax pager that will be called on each page change and doing extra when data binding with each row requires more options to configure.

If You want to pass a function that will be called on each row creation, here is what you should you

$("table").CreateTable({ Body: data,OnRow_Bounded:yourCallBackFunction });

This function will be passed the row type (head,body) as first argument and the data that is being bounded to this row and the row (tr) itself. Here you can do special tasks like convert the bounded boolan to a checkbox as you can see in the below code
function OnRow_Bounded(rowData, row, rowType) 
{
    if (rowType == "body") 
    {
      var status_checkbox = $("<input type='checkbox'/>").attr('checked', rowData["isActive"]).bind('click', rowData, EmployeeStatus_Change);
      $("td:contains(" + rowData["isActive"] + ")", row).text('').append(status_checkbox);

    }
  return row;
}
Pager:
You can turn off pager by setting Pager:false.

Using ajax data source with pager.

Pager will generate next/previous according to total records and page size but it can be forsed to set as an Ajax pager. In this mode, total pages will be set in options along with ajax pager set to true as shown blow
$("table").CreateTable({ Body: null, TotalPages: 10, AjaxPager: true });

This will give an object that could be used to refresh table when a record is received. A sample is included in the download that shows how to do it in Asp.Net.

Exposed Object:

Var tble=$("table").CreateTable({ Body: null, TotalPages: 10, AjaxPager: true });

Gives an object of type Table that is created to build a table from template using the provided data. This object has the exposure to all the internal data and functions. Lets assume that you just want to change the data source but not the current page or anything else. This situation can be handled by simply using the following code
tble.Body= your new data source here;
tble.Refresh();
and here you go with your new data source.

Download Plug-in and sample
Download Asp.Net ajax sample and Plug-in

Create a jquery plug-in : creating a jquery plug-in that can convert JSON array into table

How Do I? Create a jquery plug-in : creating a jQuery plug-in that can convert JSON array into table


Download Plug-in with Samples
Download Plug-in with Asp.net Ajax Sample

This article is about learning how to create jQuery plug-in by actually creating one. I have prepared a sample plug-in that can convert a JSON array into a table. This table is a template table already present in the page and this plug-in will get this table and insert the values of variables in the desired places whether they are in table attributes or inside td’s.

Creating a plug-in is not a big task but creating a reusable plug-in needs deep understanding and better decisions at design time so it can be real reusable component later. If you want to simple know the syntax of creating a plug-in in jQuery, jQuery website has all the information and you can check it from this link
jQuery Plug-in Authoring

However this article is about creating jQuery plug-in, it’s about doing better decision while creating a plug-in. Here are some considerations

1- Plug-in should work even without binding it to jQuery
2- Plug-in should be able to maintain its state(data) for event handling
3- Plug-in should be able to attach to as much elements as we want in a page
(That means it should be object orient rather than procedural)

I am assuming that before reading this article you arefamiliar with javascript prototype programming. But if you are not, please read this article before proceedint "Object Oriented Programming in JavaScript"

In this article I will discuss in detail about all of these aspects of a plug-in. It’s a very simple plug-in and let start building it and while on it, I will discuss the above listed points. Following is the main constructor and possible listed options of table plug-in

function Table(tbl, data)
{
    //data for head and body
    this.Body = data.Body; 
    // table object
    this.RTable = tbl;
    // template for head and body and footer
    this.BodyTemplate;


    // call back function to be called on row data bound
    this.OnRow_Bounded=data.OnRow_Bounded;

    this.GatherTemplate();
    if (this.Body != null) 
    {
      this.Create();
    }
}

This is the function that will gather the template from header/footer and body from the passed table object and this template will be used to bind data
Table.prototype.GatherTemplate = function() {

    this.BodyTemplate = $("tbody", this.RTable).html();
    $("tbody tr:first", this.RTable).remove();

}

After getting all the templates, this will save the required templates that will help in building table.
After gathering template, this next function will build the table and display it on the screen

Table.prototype.Create = function() 
{
  var i = this.CurrentPage == 0 ? 0 : this.CurrentPage * this.PageSize;

  var limit = i + this.PageSize > this.Body.length ? this.Body.length : i + this.PageSize;

  for (; i < limit; i++) 
  {
    this.RTable.append(this.CreateRow(this.BodyTemplate, this.Body[i]));
  }
            
}
This function will create a row and will optionally call a row bound function that can be used for doing different options.
Table.prototype.CreateRow = function(template, rowData) 
{

  for (var i in rowData) 
  {
    var exp = new RegExp("{" + i + "}", "g");
    template = template.replace(exp, rowData[i]);
  }
  var row = $(template);
  if (typeof OnRow_Bounded == 'function') 
  {
    row = OnRow_Bounded(rowData, row, "body");
  }
  return row;
}
Now this is a complete plug-in and when Table function will be called. It will generate a table and display it the place where the template table is placed. Now if you see that this is not a jQuery plug-in yet but it can be used as a plug-in by using it following way
  Var table=new Table($(“table:first”),{Body:yourJSONData});
What it takes it to convert it to a jQuery plug-in is very simple. 1- Initilize a default options object var options = { Head: null, Body: null, AjaxPager: false, CurrentPage: 0, TotalPages: 0, PageSize: 10, Pager: true,OnRow_Bounded:null,OnPager_Clicked:null } 2- Extend the jQuery library
$.fn.CreateTable = function(data) 
{
  //if (this.length > 0) {
  $.extend(options, data);
  var index = 0;
  var objArray = new Array();
  this.each(function() 
  {
    objArray[index] = new Table($(this), options);
    index++;
  });
  return objArray;
  //}
}
Inside this on using a each loop for all tables in the page will bind data to all tables. Default options are extended with extend jQuery object and now this is a complete jQuery plug-in that you can call using jQuery by using the following syntax
  $(“table”).CreateTable({options});
As you can see inside the each loop , a new Table object is created and it works the way it should be. About the second point, where I mentioned it should maintain its state. This plug-in will give back the array of Table objects. These objects can be used to get or set state. These objects can be used in many ways. This article does not cover the whole plug-in but it has the taste of what it is capable of. This article includes various working examples that can be downloaded from the below link. http://rapidshare.com/files/447560766/jQuery-CreateTable-PlugIn.zip

Monday, January 24, 2011

Face Detection based on Skin colour point pixel processing using OpenCV

How Do I? Face Detection based on Skin colour point pixel processor using OpenCV


This was my project for Digital Image Processing in NUST taught by a great teacher Naveed Sarfaraz Khattak. Thanks all for giving such knowledge and making it easy to study.

Problem Description:

The program will input colour triples, or subimages, that are training samples of human face colour. Let's refer to this colour as C. (Human face colour should NOT be built into the program. By doing this, we should be able to use the same program to extract water, green grass, etc.)
The program will read some constraints on the features of the regions targeted, such as the range of area, elongation, etc.
The program will identify all pixels of the input image that have colour similar to the training samples.
The program will identify each connected region of colour C as an object and measure features of each such region. The program will report only those regions that have properties similar to a human face.
The program will output the input image in P3 format with the bounding box of each face candidate overlaid in white (225,225,225)

Summary of Choices:
I have done this project in OpenCV library using Visual Studio 2010. I am using
1- OpenCV for Image Analysis
2- WPF for presentation Layer along with C#


Skin colour detection Methods:
There are two ways of detecting skins,
1- Region based detection
2- Point pixel processing

This project requires doing the pixel processing.

Colour Models:
There are different types of colour models. Most used and known colour model is RGB. This colour model presents the colour in three bytes with each byte present a property of colour. To process skin colour in this model requires processing all three byte values.

HSV is the other well known format. This format presents the colour detail in one byte the other two bytes used to store the strength and brightness of colour. Using this colour model has added benefit of one dimension processing rather than three dimensions processing in RGB colour model.

For this project, I have chosen to use the HSV colour model. By going through the different research publishing on point processing and their result, HSV produces the best pixel processing results as you can see in figure 1.


HSV for colour detection:

HSV colour model uses H for saving the colour. Only using H for skin detection can very successful. Skin colour is different between different races. Using the result of “Comparative Study of Statistical Skin Detection Algorithms for Sub-Continental Human Images” determines that


Range Result

2<h<45
95.4

4<h<40
93.2

5<h<35
91.1

10<h<30
84.8

Using the above table and by experimenting with different range of H, I end up using 6<h<18 that produces the good result in my selected images from internet.

Skin colour detection Algorithm:

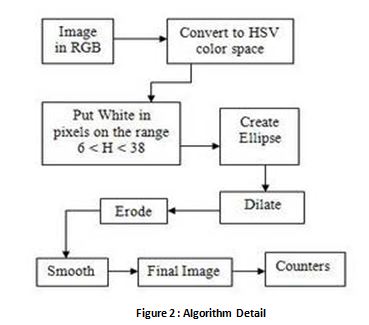
Algorithm is based on the study of HSV “Skin Detection using HSV colour space”. Following figure shows the details


Figure 2 : Algorithm Detail

Algorithm:
Open Image
Convert Image to HSV colour model
For each row of height
For each column in width
If pixel’s H is between 6 and 18
Tag this as skin pixel
Else
Tag this as a white pixel
End For
End For

Dilate Image with 5x5 Kernel
Erode Image with same 5x5 Kernel
Median Smooth with 3x3 Kernel

Use the Label Image Project 2
After Objects has been labelled
Draw Rectangle on every Object find

Code:

// Detecting skin inside the picture
String^ SkinDetection(String^ filePath,String^ savePath,String^ extension)
{
  // Primary image
  IplImage *primaryImage = cvLoadImage( StringToChar(filePath),1);
  // creating image from the source
  IplImage *source=cvCreateImage( cvGetSize(primaryImage), 8, 3 );
  // creating HSV image from the source
  cvCvtColor(primaryImage,source,CV_BGR2HSV);
  // Destination image that will be created from the image, binary image
  IplImage *destination=cvCreateImage( cvGetSize(source), 8, 1 );
  // intermediate image that will only have SKIN
  IplImage *intermediateImage=cvCreateImage(cvGetSize(source),8,3);

  int height= source->height; // number of lines
  int bytesPerRow= source->width * source->nChannels; // total number of element per line
  int channels=source->nChannels;
  int step= source->widthStep; // effective width

  unsigned char *data= reinterpret_cast<unsigned char *>(source->imageData);
  unsigned char *dData= reinterpret_cast<unsigned char *>(destination->imageData);
  unsigned char *iData= reinterpret_cast<unsigned char *>(intermediateImage->imageData);
  unsigned char *pData= reinterpret_cast<unsigned char *>(primaryImage->imageData);


  int dIndex=0;
  int dStep=destination->widthStep;

  //start of parsing each pixel
  for (int i=0; i<height; i++) 
  {
    dIndex=0;
    for (int j=0; j<bytesPerRow; j+= channels) 
    {
      int value=data[i*step+j];
      if(value> 6 && value<18) // if skin is in this pixel
      {
         iData[i*step+j]=pData[i*step+j];
         iData[i*step+j+1]=pData[i*step+j+1];
         iData[i*step+j+2]=pData[i*step+j+2];
         dData[i*dStep+dIndex]=0; 
      }
      else // if skin is not in this pixel
      {
         iData[i*step+j]=255;
         iData[i*step+j+1]=255;
         iData[i*step+j+2]=255;
         dData[i*dStep+dIndex]=255;
      }
      dIndex+=destination->nChannels;
   }

  }

    // 
    SaveImage(source,savePath+"_HSV.jpg");
    SaveImage(destination,savePath+"_Skin.jpg");
    // Dilate the image
    destination =Dilate(destination);
    SaveImage(destination,savePath+"_Dilated.jpg");
    // Erode the image
    destination=Erode(destination);
    SaveImage(destination,savePath+"_Eroded.jpg");
    // Smoothing image
    destination=MedianSmooth(destination);
    SaveImage(destination,savePath+"_MedianSmooth.jpg");
    //Labeling image and showing bounding box
    SaveImage(intermediateImage,savePath+"_Intermediate.jpg");
    String^ objects=LabelIamge(SaveImage(destination,savePath+"_Label.jpg"),savePath,primaryImage);
    return objects;
}

Description:
With the look at above algorithm, it becomes relatively easy to do the skin detection. Using the last project code, I was able to label the output image of skin detection. Skin detection function output the binary image that became the input for label image. Label image function goes through each object and trashes the objects with regions that have less than twenty pixels. Than using the bounding box details of each object found in the labelled image, a red circle drawn as the bounding box.

Results:

Many images are used to test the result of this program. Algorithm goes through the image and output the eight images on every stage of processing

Original Images:


HSV images:


Skin Detected:
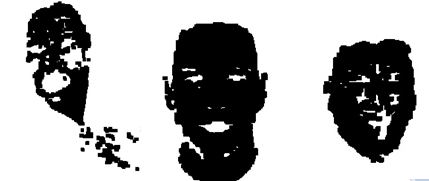
Notice all the noise in binary images


Dilation:

Notice all noise is removed


Erode:


Median Smooth:


Labelled Image:


Main program screen:


Reference Materials:

1- Skin Detection using HSV colour space by V. A. OLIVEIRA, A. CONCI

2- Comparative Study of Statistical Skin Detection Algorithms for Sub-Continental Human Images by M. R. Tabassum, A. U. Gias, M. M. Kamal, H. M. Muctadir, M. Ibrahim, A. K. Shakir, A.Imran, S. Islam, M. G. Rabbani1, S. M. Khaled, M. S. Islam, Z. Begum

3- Color Space for Skin Detection – A Review by Nikhil Rasiwasia Fondazione Graphitech, University of Trento, (TN) Italy


Download source project + document + sample images + resulted images

Finding objects inside image using Classical Connected Component binary image analysis method using OpenCV

How Do i? Find objects inside image using Classical connected component in binary image using OpenCV


This was my project for Digital Image Processing in NUST taught by a great teacher Naveed Sarfaraz Khattak. Thanks all for giving such knowledge and making i easy to study.

Problem Description:

The objective of this project is to gain experience with connected components analysis and the use of features computed within it for recognition of objects. This problem is to implement a connected components program so that it will report on all objects found in the input image and computes all inter object distances.

This Project will

1- Find objects
2- Calculate their area
3- Calculate Centroid
4- Distance between each object (distance matrix)
5- Bounding box


Summary of Choices:

I have done this project in OpenCV library using Visual Studio 2010. I am using
1- OpenCV for Image Analysis
2- WPF for presentation Layer along with C#

This project requires
OpenCV 2.0+
Visual Studio 2010

Sample Images:


Result Discussion and Algorithms:

This program is written in OpenCV to learn and implement the open standard of image processing system. This program can run on any Windows machine where OpenCV is installed and .Net FrameWork 4.0 is available.

This program used Connected Component union find algorithm to find the neighbours of each pixel and tag that pixel in this the image. Where there are more than one neighbours for one pixel value, a confilict note is made.

After going through whole image, conflicts are resolved. There was a problem in conflict resolution and it was not possible to solve the labels in two go, instead it took k iterations to resolve the whole k conflicts due to the problem that one connected component can hold more than 2 labels if it is has a difficult shape.

After finding all the objects, each object than processed for its features. Finding area was easy so does the centroids. Bounding region takes a while but the real problem and time consumed in finding connected objects. After working 4 days and nights I am able to complete the project but there is no time to write the whole story before submission of this report.

This program is using the layout as described below.

1- It has a button to open the image,
2- Open the image will trigger the binary analysis
3- It will show the image analysis
4- To see the distance matrix, click on the distance matrix tab

Please see the image below for reference


Results:


Code:

This is a very long function and its not all of it. You can download the whole project, document and image dump at the end of this article.

//This is the main function that will label the image
String^ LabelIamge(String^ filePath,String^ savePath)
{
  IplImage *source = cvLoadImage( StringToChar(filePath),0);
  int height= source->height; // number of lines
int bytesPerRow= source->width * source->nChannels; // total number of element per line
int step= source->widthStep; // effective width

unsigned char *data= reinterpret_cast<unsigned char *>(source->imageData);

//number of objects in the picture
int objects=1;
//if a number is already used to add new number
bool isConsumed=false;
//Four neighbours of the concerned picture
int neighbours[4];
//This will register all confilicts
Hashtable mapTable;

//start of parsing each pixel
for (int i=0; i<height; i++) {
for (int j=0; j<bytesPerRow; j+= source->nChannels) 
{
//if the current pixel is a black pixel
if(data[i*step+j]==0)
{
//left neighbour
if(j>0)
{
if(data[i*step+(j-1)]>255)
neighbours[LEFT]=data[i*step+(j-1)];
else
neighbours[LEFT]=-1;
}

//left top neighbour
if(j>0 && i>0)
{
if(data[(i-1)*step+(j-1)]<255)
neighbours[LEFTTOP]=data[(i-1)*step+(j-1)];
else
neighbours[LEFTTOP]=-1;
}

//top neighbour
if(i>0)
{
if(data[(i-1)*step+(j)]<255)
neighbours[TOP]=data[(i-1)*step+(j)];
else
neighbours[TOP]=-1;
}

//right top neighbour
if(i>0 && j+1>bytesPerRow)
{
if(data[(i-1)*step+(j+1)]<255)
neighbours[RIGHTTOP]=data[(i-1)*step+(j+1)];
else
neighbours[RIGHTTOP]=-1;
}

//number of neighbours found
int totalNeighbours=Neighbours(neighbours);
int* sNeighbours;
//if neighbours are there, serialize the neighbours in asc order and find the numbers of real neighbours
if(totalNeighbours>0)
{
SerializedData data=NeighboursSerial(neighbours);

sNeighbours=data.ary;
totalNeighbours=data.size;

BubbleSort(sNeighbours,totalNeighbours);
}

//if no neighbour, assign the new number
if(neighbours[LEFT]==-1 && neighbours[LEFTTOP]==-1 && neighbours[TOP]==-1 && neighbours[RIGHTTOP]==-1)
{
data[i*step+j]=objects;
isConsumed=true;
}
//if there are one neighbour, then assign the neighbour lable to the pixel
else if(totalNeighbours==1)
{
data[i*step+j]=sNeighbours[0];
}
// if there are more than one neighbours, then assign the minimum neighbour from the sorted neighbour array and add the next neighbour to conflict table
else
{
data[i*step+j]=sNeighbours[0];

//add the conflict only if it doesnot exist before
if(mapTable.ContainsKey(sNeighbours[1])==false)
{
mapTable.Add(sNeighbours[1],sNeighbours[0]);
}
}
}
// if pixel is not black, then increment the object number if it is not already used.
else
{
if(isConsumed)
{
isConsumed=false;
objects+=1;//+;
}
}
}
}

//translate all the map table into desc order and resolve the conflict by using the conflict table
ICollection^ keyColl = mapTable.Keys;
int mtLength=mapTable.Count;
int* a=new int[mtLength];
int index=0;

for each( int s in keyColl )
{
a[index]=s;
index++;
}

BubbleSortDesc(a,mapTable.Count);
for(int k=0;k<mtLength;k++)
{
for (int i=0; i<height; i++) {
for (int j=0; j<bytesPerRow; j+= source->nChannels) 
{
if(data[i*step+j]==a[k])
{
data[i*step+j]=(int)mapTable[a[k]];
}
}
}
}

//find the number of objects in the table
ConnectedObject* totalObjects=CountObjects(source,objects);
int count=0;
//discart the objects that are less than threshhold i.e. 20 pixels
totalObjects=RealObjects(totalObjects,objects,threshHold,count);
//find the centroids
Centroids(source,totalObjects,count);
//find the distance between each object
String^ distances=EuclideanDistance(totalObjects,count);
//color the image to display friendly colors and distinguish each object
IplImage *destination=LabeledToColorImage(source,totalObjects,count,objects);
//save image
SaveImage(destination,savePath);
// return the report in JSON format for data exchange between .Net and openCV
return ConnectedObjectToJSON(totalObjects,count,distances);
}

click here for Source Project + Sample Images + Project Results + Document

Sunday, January 23, 2011

Comparision of String and JavaScript/jQuery based Dom Element Creation Result and Conclusion

Comparision of String and JavaScript/jQuery based Dom Element Creation Result and Conclusion


Please read
Part no.1 and

Part no.2
and

Part no.3

and

Part no.4

before reading this Part no.4

Result:
Time Spent to generate 100 tables in Minute : Seconds : MilliSeconds

Firefox 3.6.13 Chrome 8.0.552.237 IE 9.0.79 Memory (Chrome) in KB
Test no.1 0:6:38 0:3:283 0:10:730 31,384
Test no.2 0:1:31 0:0:533 0:2:521 34,860
Test no.3 0:8:60 0:6:969 0:14:520 49,164
Test no.4 0:2:81 0:1:992 0:3:445 35,140

Now as test result are in, there are more perspective to compare both techniques in terms of
1- Time to Response
2- Memory Management
3- Extendibility
4- Readability
5- Modifiability
6- Object Oriented


Response Time:
Responsiveness could be seen easily in test no.2 and jQuery beats the string based object creation with a long distance.

Memory Management:
Even though test no.1 has better memory management but as we move to test no.3, there is a very noticeable memory consumption change. This is due to the fact that strings are immutable and with addition of strings, it will consume more memory and will not free any of it. Test no.2 and 4 were more or less common in memory consumption due to the fact that objects will get destroyed if they are not in use and will not occupy the memory.

Extendibility:
Extending to OnRow_Bounded in test no.2 proved to be better as we were doing the object processing and it was easy to update a td inside tr object and specially jQuery selector helped.


Readibility/Modifiability:
jQuery based technique has better readability. Strings will get hard as we have more things to add where as jQuery based dom creation has better techniques of handling adding attribute and events binding.

Object Oriented:
Dom creation based on string is not appreciated usually and jQuery based technique is object oriented.

Conclusion:
By comparing different perspective, it is clear that using jQuery or even javascript object based technique is always better in term of performance and realiability where as string based looked like better approach in small operations but lacks serious performance and memory management along with other perspective comparison.

Where to go from here:
Next time I will try to convert this program into a jQuery plugin that will convert the JSON object into a table or will try to come up with a better technique for displaying data using templates. That will help in understanding jQuery plug in creation.

I hope this will help in understanding of choosing right way when working with client applications that requires alot of data displaying and manipulation.

Download link for source code and documentation

Test no.3,4: Extending String and jQuery based techniques for creating DOM elements for adding more functionality

Test no.3,4: Extending String and jQuery based techniques for creating DOM elements for adding more functionality


Please read
Part no.1 and

Part no.2
and

Part no.3
before reading this Part no.4

I will try to add a function in both techniques. This function will be called whenever a row will be bounded to an instance of array object. This will be helpfull in doing many operations but i will try to change the boolean value into a check box. Then i will call a function onclick event of checkbox for simulation.

Test no.3: Extendibility on data bounded with tr in test no.1
function Row(rowData) 
{
  var tr = "<tr>";
  for (var i in rowData) 
  {
    tr += "<td>" + rowData[i] + "</td>";
  }
  tr += "</tr>";
  if (typeof OnRow_Bounded == 'function') 
  {
    tr=OnRow_Bounded(rowData, tr);
  }
  return tr;
}

function OnRow_Bounded(rowData,row) 
{
  if (rowData["isActive"] == true) 
  {
    row = row.replace("true", "<input type='checkbox' checked='checked' onClick='EmployeeStatus_Change(" + rowData.sr + ",\"" + rowData.FirstName + "\");' />");
  }
  else 
  {
    row = row.replace("false", "<input type='checkbox' onClick='EmployeeStatus_Change(" + rowData.sr + ",\"" + rowData.FirstName + "\");' />");
  }
  return row;
}

function EmployeeStatus_Change(sr,firstName) 
{
  confirm('Do you want to change the ' + firstName + ' status?');
}

Following picture shows the addition of checkbox


Test no.4: Extendibility on data bounded with tr in test no.2
function Row(rowData) 
{
  var tr = $("<tr></tr>");
  for (var i in rowData) 
  {
    tr.append($("<td></td>").text(rowData[i]));
  }
  if (typeof OnRow_Bounded == 'function') 
  {
    tr = OnRow_Bounded(rowData, tr);
  }
  return tr;
}

function OnRow_Bounded(rowData, row) 
{
  var status_checkbox = $("<input type='checkbox'/>").attr('checked', rowData["isActive"]).bind('click', rowData, EmployeeStatus_Change);
  $("td:contains(" + rowData["isActive"] + ")", row).text('').append(status_checkbox);
  return row;
}

function EmployeeStatus_Change(event)
{
  var rowData=event.data;
  confirm('Do you want to change the ' + rowData.FirstName + ' status?');
}

and following picture shows the extended result


Continue to Part no.5

Test no.2: Displaying data with jQuery based dom element creation in JavaScript/jQuery

Test no.2: Displaying data with jQuery based dom element creation in JavaScript/jQuery


Please read
Part no.1 and

Part no.2
before reading this Part no.3

This is the same as test no.1 the only difference is the use of jQuery instead of string for creation of Dom elements.

"Now by using the JSON object when window.onload function will be called a function will pass the function to create function. This function will first save the starting time in a variable and then generates the 100 tables. Then this will save the end time. Time difference will then calculated and displayed on top of tables. and following is the sample code for generating the tables using string based operations."

$(function () { DisplayEmployees(jsonData); });
var startTime;
var endTime;
var totalTables=100;

function DisplayEmployees(data) 
{
  startTime = new Date();
  var mainDiv = $("#dvMain");
  for (var i = 0; i < totalTables; i++) 
  {
    mainDiv.append(Table(data));
  }

  endTime = new Date();

  var timeSpend = new Date(endTime - startTime);

  $("#dvTime").text("Time Spent to generate " + totalTables + " in Minute : Seconds : MilliSeconds = " + timeSpend.getMinutes() + ":" + timeSpend.getSeconds() + ":" + timeSpend.getMilliseconds());
}

function Table(data) 
{
  var table = $("<table></table>").attr({ cellpadding:'0',cellspacing:'0', border:'1'});

  for (var i = 0; i < data.length; i++) 
  {
    table.append(Row(data[i]));
  }
  return table;
}


function Row(rowData) 
{
  var tr = $("<tr></tr>");
  for (var i in rowData) 
  {
    tr.append($("<td></td>").text(rowData[i]));
  }
  return tr;
}

The following picture shows you the result of this script
Continue to Part no.4

Test no.1: Displaying data with string based dom element creation in JavaScript

Test no.1: Displaying data with string based dom element creation in JavaScript


please read the Part.1 before continu


Now by using the JSON object when window.onload function will be called a function will pass the function to create function. This function will first save the starting time in a variable and then generates the 100 tables. Then this will save the end time. Time difference will then calculated and displayed on top of tables. and following is the sample code for generating the tables using string based operations.

window.onload = function () { DisplayEmployees(jsonData); }
var startTime;
var endTime;
var totalTables = 100;
function DisplayEmployees(data) {
startTime = new Date();
for (var i = 0; i < totalTables; i++) {
document.getElementById("dvMain").innerHTML = document.getElementById("dvMain").innerHTML+Table(data);
}
endTime = new Date();
var timeSpend = new Date(endTime - startTime);
document.getElementById("dvTime").innerHTML = "Time Spent to generate "+totalTables+" in Minute : Seconds : MilliSeconds = " + timeSpend.getMinutes() + ":" + timeSpend.getSeconds() + ":" + timeSpend.getMilliseconds();


}
function Table(data) {

var table = "<table cellpadding='0' cellspacing='0' border='1'>";
for (var i = 0; i < data.length; i++) {
table += Row(data[i]);
}
table += "</table>";
return table;
}
function Row(rowData) {
var tr = "<tr>";
for (var i in rowData) {
tr += "<td>" + rowData[i] + "</td>";
}
tr += "</tr>";
return tr;
}

The following picture shows you the result of this script


Continue for Part no.3

Creating Dom elements in JavaScript/jQuery (table,div,span) using different techniques, their comparison based on performance and memory management

How Do i? Create Dom elemens in JavaScript/jQuery (table,div,span) using different techniques, their comparison based on performance and memory management.

This is a 5 part article which takes you from different techniques to comparison of these techniques. It sounds like a long journey but nature of this article made me to go so long. Even though i skipped many explanations to save space and try to wind up things, i still end up this 5 part series.


Part no.1 Introduction


Part no.2 Test no.1


Part no.3 Test no.2


Part no.4 Test no.3,4


Part no.5 Comparison, Result and Conclusion


In many cases we have to create Dom elements (table, div, span, etc) in JavaScript. It could be due to the fact that we have to consume a web service and display data in tabular form. Or update a tabular record by calling an Ajax routine.
There could be many ways to achieve this but the most used form of creating Dom elements are of using the magic strings.

var div="<div>Operation Completed </div>";
document.getElementbyId('dvMain').innerHTML=div;
This is very easy way to create a Dom element. It does not hurt performance and there is not a lot of memory consumption. But the fact that it’s not the right way of doing such thing remains. There is one better way of doing this
var element=createElement("div");
element.innerHTML="Operation Completed";
var insertBeforeElement=document.getElementById('dvMain');
document.body.insertBefore(element,insertInside);
doing so requires a lot of effort especially when it comes to built tables. Cross browser compatibility came into action and it takes a lot of time to make cross browser java scripting. This could be answered by using some cross browser library e.g. jQuery, YUI,mooTools. Syntax for such operation in jQuery would be like
var element=$("<div></div>").text("operation completed");
$('#dvMain').append(element);
The above syntax is short and result is cross browser. Above technique uses the createElement under the hood to generate the elements. For more information please check the jQuery core library reference.

Then there comes the question of performance. If we are not achieving performance or saving memory by the right technique why we are considering this as a better technique? At the end things comes to response time and memory management.
I have created a test pattern to check memory management and responsiveness. I have a JSON object which is an array of object. I will display this object in tabular form by using a generic table creator method and then I will try to extend this method to support more operations like doing an operation when a data is bound to an array.

I will generate about 100 tables to check the responsiveness and then I will use the chrome browser tab management for memory in both cases. Time logging will be done by taking the start time and end time difference.

I have 4 tests in all

1. Creating 100 tables using string
2. Creating 100 tables using jQuery
3. Extending test no.1 when row is bounded with a tr and try to manipulate it
4. Extending test no.2 when row is bounded with a tr and try to manipulate it


JSON object that will be used in every example

var jsonData = [
    { 'sr': 0, 'FirstName': 'Ahmed', 'LastName': 'Mushtaq', 'Mobile': '03003333333', 'isActive': false },
    { 'sr': 1, 'FirstName': 'Ali', 'LastName': 'Raza', 'Mobile': '0300123876', 'isActive': true },
    { 'sr': 2, 'FirstName': 'Ghalia', 'LastName': 'Ahmed', 'Mobile': '0300098765', 'isActive': false },
    { 'sr': 3, 'FirstName': 'Shamoon', 'LastName': 'Perez', 'Mobile': '0300123456', 'isActive': true },
    { 'sr': 4, 'FirstName': 'Chaman', 'LastName': 'Nargis', 'Mobile': '0300987789', 'isActive': true },
    { 'sr': 5, 'FirstName': 'Naseer', 'LastName': 'Ali', 'Mobile': '0300777777', 'isActive': true },
    { 'sr': 6, 'FirstName': 'Sunbal', 'LastName': 'khalid', 'Mobile': '03000987653', 'isActive': false },
    { 'sr': 7, 'FirstName': 'Sameer', 'LastName': 'Raja', 'Mobile': '03002345678', 'isActive': true },
    { 'sr': 8, 'FirstName': 'Salat', 'LastName': 'Khair', 'Mobile': '03008888888', 'isActive': false },
    { 'sr': 9, 'FirstName': 'Shazia', 'LastName': 'Manzoor', 'Mobile': '03003333333', 'isActive': true },
    { 'sr': 10, 'FirstName': 'Shabeer', 'LastName': 'Ali', 'Mobile': '03000987657', 'isActive': false },
    { 'sr': 11, 'FirstName': 'Shoukat', 'LastName': 'Aziz', 'Mobile': '03002345679', 'isActive': true },
    { 'sr': 12, 'FirstName': 'Rizwan', 'LastName': 'Ahmed', 'Mobile': '030000000000', 'isActive': true },
    { 'sr': 13, 'FirstName': 'Jamsheed', 'LastName': 'Junaid', 'Mobile': '03001111111', 'isActive': true}];

It has 14 rows 0 to 13 indexed.

Part no.2

Thursday, January 13, 2011

Better Asp.Net MVC Architectural decisions

How Do I? create better architecture of Asp.Net MVC application


Websites are no more simple websites. Minimum list of features required today converts them to applications and change is always on its ways. Creating a web application is not a difficult task but there are many scenarios where we got stuck due to lack of architectural support.

Who creates the architecture? this real answer to this question is "Our Requirements". In today world of Rapid development, processes are not important rather its people who are important. Main problem lies with the client and then the company perspective of application development.

The main logic of any manager or client is "every thing can be coded, why its taking so much time". That is the death of software engineering.

This logic is good, good for client and maybe company when they want easy money easily and things working out the way it should be but this is the same reason that makes me believe we are not progressing, we are going back.

People said Generalization is for mathematicians and specialization is for software engineers. I agree we have to specialize things to make it usable by the general public, to show it in the presentation layer. but is it really true what we show and what we code are the same things?

I came across many things in my coding career and whenever i generalized, i was too happy to sleep that night and many times i saved 1000's of lines of code and re usability was just too much. That's the art of coding and that is the way of Software engineer.

This is the case when i was having appropriate amount of time to think, but this is not true in all cases. We have to code like we type and that always lead to a poor architectural decisions and poor application quality and in this scheme there is not DRY. I love DRY and yet i am repeating myself again and again.

In such circumstances where we have to deliver without thinking i created a generic application pattern and i am sure that this will help in long run and with time it will get mature.

Better application is about better architectural decisions. here are my architectural decisions, let me know if you have any. Even though these are related to Asp.Net MVC.

Architectural Decisions:


With the introduction of WPF and Silverlight on its Dot net platform, Microsoft has also provided a guide of new architecture pattern that helps avoiding many pitfalls in development of RIA applications. This architecture is called MVVM (Mode View and View-Model). Main advantage of using this architecture is to limit the dependency of different components on each other along with a better implementation of presentation layer, where this layer would only be showing the required data and firing events for requesting data. This will have very clean and neat presentation layer and will leave the presentation layer to decide only about how to present the data.

Along with the above stated benefits, View-Model also helps to implement the presentation layer to implement in solid object oriented way rather than using or coding the magic string all around that at the end will leads to poor QC, high maintenance time.
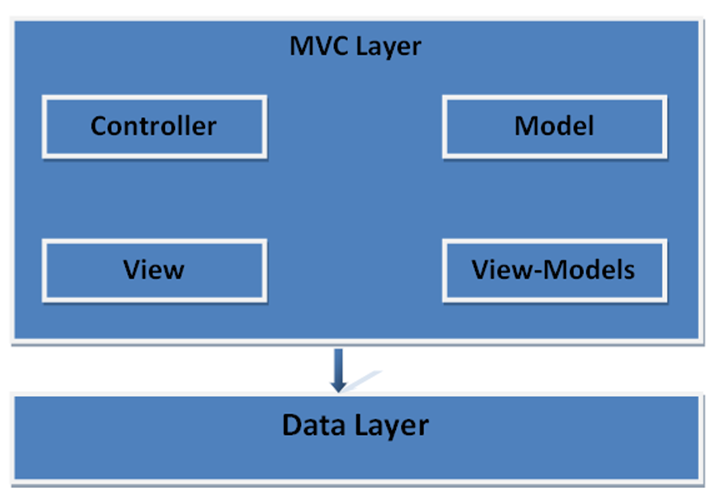
Having described all the benefits still leaves the details of implementation details and how View-Model will be implemented in MVC pattern. The following picture presents the whole sequence of logical operations.
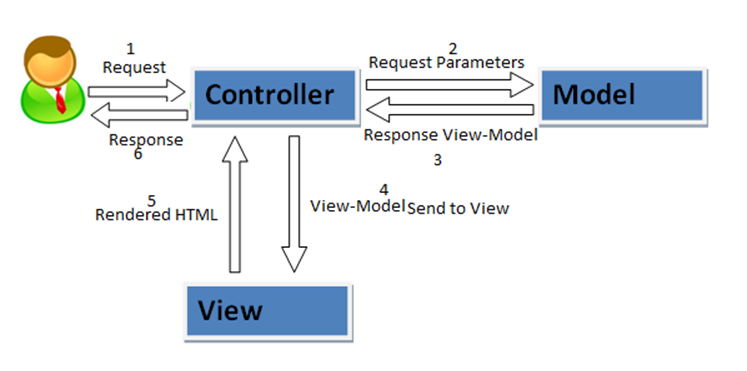
Logical View of MVC with View Model:


Top level System View:


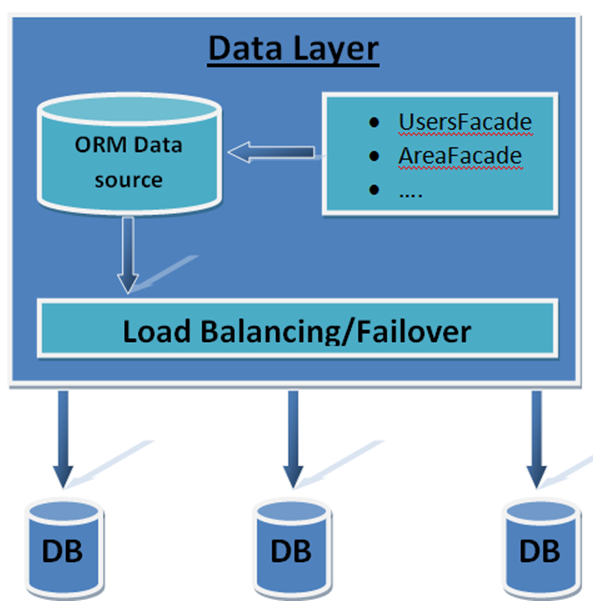
Data Layer View


sample User Controller from all the perspective:


This diagram shows that for every Controller, there must be at least one business object(Model) and one to many View-Models. because View models are required for views. There are as many view models as views. and lastly there would be at least one Facade in data layer that present the all operations of business object. Facade is depending of Model not on controller.


Top Level View Model:


There must be one base view model for many many reason. Experts already know and beginners always gets in trouble due to this. The problem rises when we use master page for doing many master operations e.g. login and user status. in this case master page will always accept a view model and view model that we will pass to the view will not fulfill it. So if we will have a base view model than we can solve this problem object oriented way. Also using base view model has superiority in error handling and standardization.


Sample Add User View Model:


That is all for right now. Any improvment suggestion is welcome and will be appreciate greatly.